Giving Help
We’ve created a visual tutorial to guide you through the one-time set-up process.
Below the log-in tutorial are instructions about setting up a donation and basic uses of your online account. Click the yellow text links to jump to those sections.
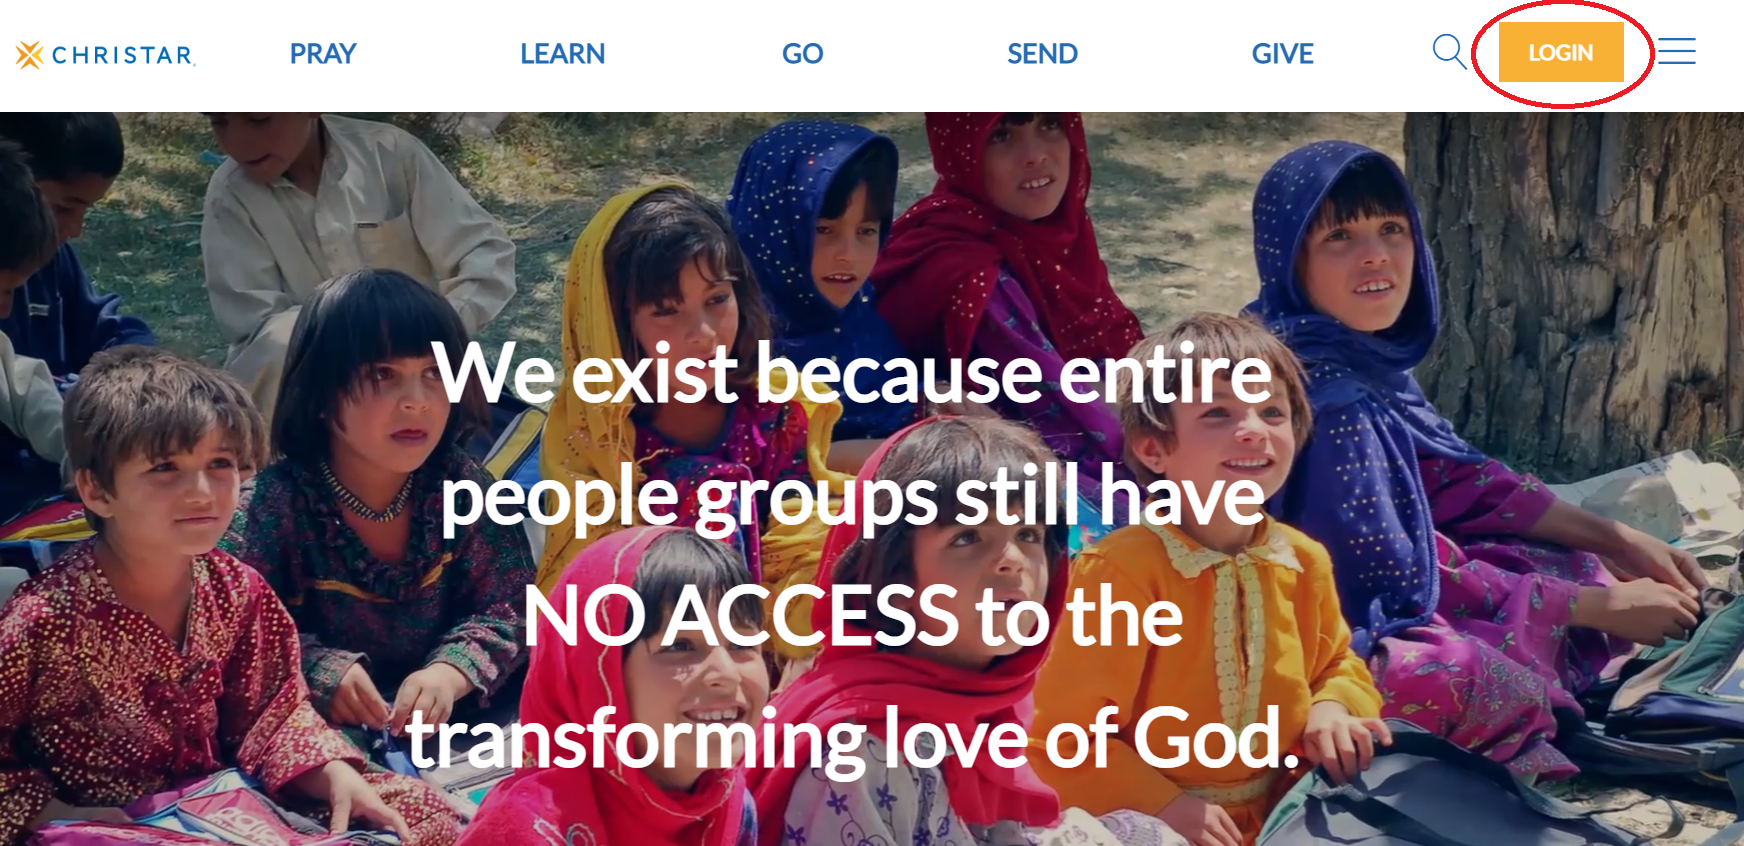
If you already have an account on our website, enter your email address and password and click “Login.” If you’ve previously logged in to the website but cannot remember your password, click “Reset your password” and follow the instructions. If you do not have an account yet, click “Register.”
If registering for a new account, fill out the information below and click “Sign Up for Free.” The password must be at least 12 characters long and must contain at least 1 capital letter, 1 number and 1 symbol.
To go to the main christar.org home page, click on the Christar logo, or click ABOUT, PRAY, LEARN, GO, SEND or GIVE, depending on what you want to see.
In the future, you can access your dashboard at christar.org by clicking the “LOGIN” button on the top right side. Use the email address that you provided and the password that you just created.
Establishing a Donation
Please Note: You must have a worker's three- or four- digit account number in order to donate to them online. We do not post names of our workers on the website for security reasons.
Step 1: Looking Up a Worker
The simplest method is the first one.
Method 1: Worker's Page

Method 2: Give Page
Please do not use the giving box on top of the photo for donating to workers!
Instead, scroll down to the first blue box on the left and type the worker's number in the white search box.

Once you type in a valid worker account number (three or four digits, depending on the worker), a second rectangle will pop up where you can input the amount of your donation. The first three characters of the worker's last name will appear where the darker blue shape is.

Method 3: Support a Worker

Once you type in a valid worker account number (three or four digits, depending on the worker), a second rectangle will pop up where you can input the amount of your donation. The first three characters of the worker's last name will appear where the darker blue shape is.

Step 2: Amount and Checkout
The dark purple is covering where the account number of your worker would show up.
The yellow highlight gives you the option of making your donation anonymous. The checkout page will default to "no."
The dark pink link is where you can add a note to your donation. Please note that the worker will see this note, and if you create a recurring donation, they will see it every time the donation repeats.
The bright green highlight is how you can make your donation be recurring!

Below is what you will see if you select the round button highlighted in green above. Note that you must create an online account in order to set up a recurring donation. That's what the Password rectangles are for.

Note: If you wish to approve the donation each month, you will need to set that up through your bank rather than through our website.

For debit/credit card donations, you will have the option of covering the 3% fee or allowing us to take it out of the donation. Note: There is no fee for electronic check donations!

Note: Although there is an option for changing the country, our web host does not easily allow for online donations from a billing address in another country.

Please do NOT select the button highlighted pink, unless you are a church staff member facilitating a gift from the church itself.
Once everything is completed, press the gold "Process Gift" button!
Using Your Donor Account
Updating Your Address
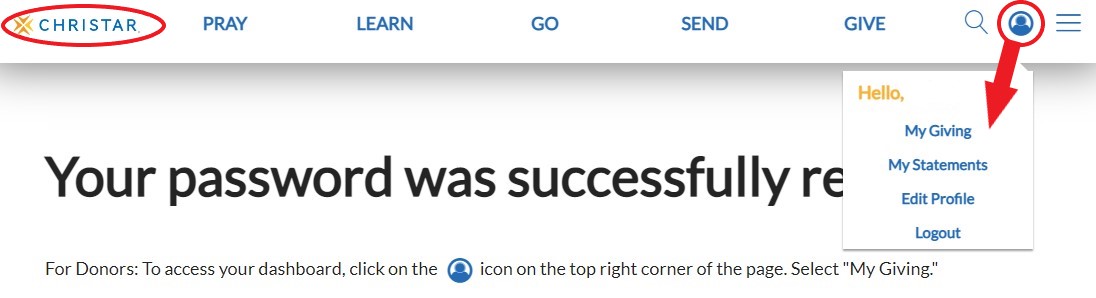
When you are logged into your giving account on christar.org, hover over the blue person (in the blue circle) at the top right and select the "Edit Profile" option. Scroll down to the address section, enter the address and save.
Making Changes to Giving
If you're logged in, hover over the blue person (in the blue circle) at the top right and select “My Giving.” The page that loads enables you to update/cancel a recurring gift as well as to update or add a payment method.
To Update or Cancel a Recurring Gift
Scroll down past the blue bar and your summary to where it says “Recurring Gifts.” Your monthly donation/s are listed there. On the right are three horizontal lines. Click those, then click “Edit.”
-
You can change the amount on the top right-hand side of the pop-up box.
-
To cancel the gift, either put an end date on the left, or change the bottom left gold button from “Active” to “Canceled.”
Updating a Payment Method
Scroll down past the blue bar, your summary and “Recurring Gifts” to where it says “My Payment Options.” Your financial giving methods are listed there.
On the right of each one there are three horizontal lines. Click those, then click “Edit.” You can update the card's expiration date or security code OR the bank account information on the new page that loads.
Adding a Payment Method
To the right of the “My Payment Options” header there is a yellow button to “Add Payment Method.” Click there, then fill in the payment information on the new page that loads. When you have completed that, click the yellow “Save” button.
Next you will need to connect the new giving method to your recurring gift. Hover over the blue person at the top right and select “My Giving” again. Then scroll down to “Recurring Gifts”. Your monthly donation/s are listed there. On the right are three horizontal lines. Click those, then click “Edit.” In the little popup box, there are three yellow dropdowns on the left-hand side. Click the down arrow next to the middle one (“Payment Method”) and select the new payment method that you just saved.
Downloading Your Annual Statement
Hover over the blue person in the circle at the top right of any page on the website. Click “My Statements” in the dropdown. Then select the year from the dropdown on the left. That will show you all your gifts in the year you select. Click the blue "Download Giving Statement” button below the year dropdown. A popup window will ask you where on your computer you want to save it. Navigate to an easy-to-find option such as Downloads or Desktop, and click the gray “Save” button at the bottom right of the popup.